Getting started
MIRACL can be run in the command-line or by using its GUI.
Command-line
Note
If you have installed MIRACL locally, run
source activate miracl first to start its virtual environment.
To look at available modules, invoke the help menu:
$ miracl -h
The following menu should be printed to the terminal:
usage: miracl [-h] {connect,conv,flow,lbls,reg,seg,sta,utils} ...

positional arguments:
  {connect,conv,flow,lbls,reg,seg,sta,utils}
    connect             connect functions
    conv                conv functions
    flow                workflows to run
    lbls                Label manipulation functions
    reg                 registration functions
    seg                 segmentation functions
    sta                 STA functions
    sta                 STA functions
    utils               Utils functions

optional arguments:
  -h, --help            show this help message and exit
If you want information about a particular module you can call it with -h.
Let’s use the conv module as an example. Invoke its help menu using:
$ miracl conv -h
You should get:
usage: miracl conv [-h] {tiff_nii,nii_tiff,set_orient,gui_opts} ...

positional arguments:
  {tiff_nii,nii_tiff,set_orient,gui_opts}
    tiff_nii            convert Tiff stacks to Nii
    nii_tiff            convert Nii volume to Tiff stack
    set_orient          Set orientation tag with GUI
    gui_opts            GUI options

optional arguments:
  -h, --help            show this help message and exit
For accessing the help menu of a specific function in the conv module,
say tiff_nii, type:
$ miracl conv tiff_nii -h
You should get:
usage:  Converts Tiff images to Nifti

A GUI will open to choose your:

    - < Input CLARITY TIFF dir >

----------

For command-line / scripting

Usage: miracl conv tiff_nii -f [Tiff folder]

Example: miracl conv tiff_nii -f my_tifs -o stroke2 -cn 1 -cp C00 -ch Thy1YFP -vx 2.5 -vz 5

required arguments:
  -f dir, --folder dir  Input CLARITY TIFF folder/dir

optional arguments:
  -d , --down           Down-sample ratio (default: 5)
  -cn , --channum       Chan # for extracting single channel from multiple channel data (default: 0)
  -cp , --chanprefix    Chan prefix (string before channel number in file name). ex: C00
  -ch , --channame      Output chan name (default: eyfp)
  -o , --outnii         Output nii name (script will append downsample ratio & channel info to given name)
  -vx , --resx          Original resolution in x-y plane in um (default: 5)
  -vz , --resz          Original thickness (z-axis resolution / spacing between slices) in um (default: 5)
  -c  [ ...], --center  [ ...] Nii center (default: 0,0,0 ) corresponding to Allen atlas nii template
  -dz , --downzdim      Down-sample in z dimension, binary argument, (default: 1) => yes
  -pd , --prevdown      Previous down-sample ratio, if already downs-sampled
  -h, --help            Show this help message and exit
To run the function with an input dir called input_tiff_dir, a down-sampling
factor of 5 and an output called test, you would type:
$ miracl conv tiff_nii -f input_tiff_dir -d 5 -o test
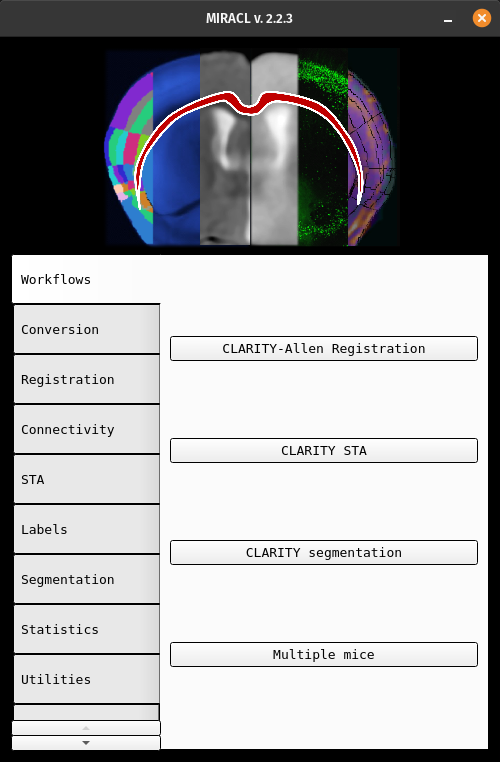
GUI
To run the main GUI:
$ miraclGUI
The GUI should open:
To get the GUI of a specific function, run it without arguments, for example:
$ miracl conv tiff_nii
Not all functions have GUIs yet…we are working on it!!!
See also
Check the rest of the tutorials for more detailed documentation on modules and functions